There are a lot of great resources to consume messages from Azure Service Bus service. The majority of these resources focus only on simple Queue subscription.
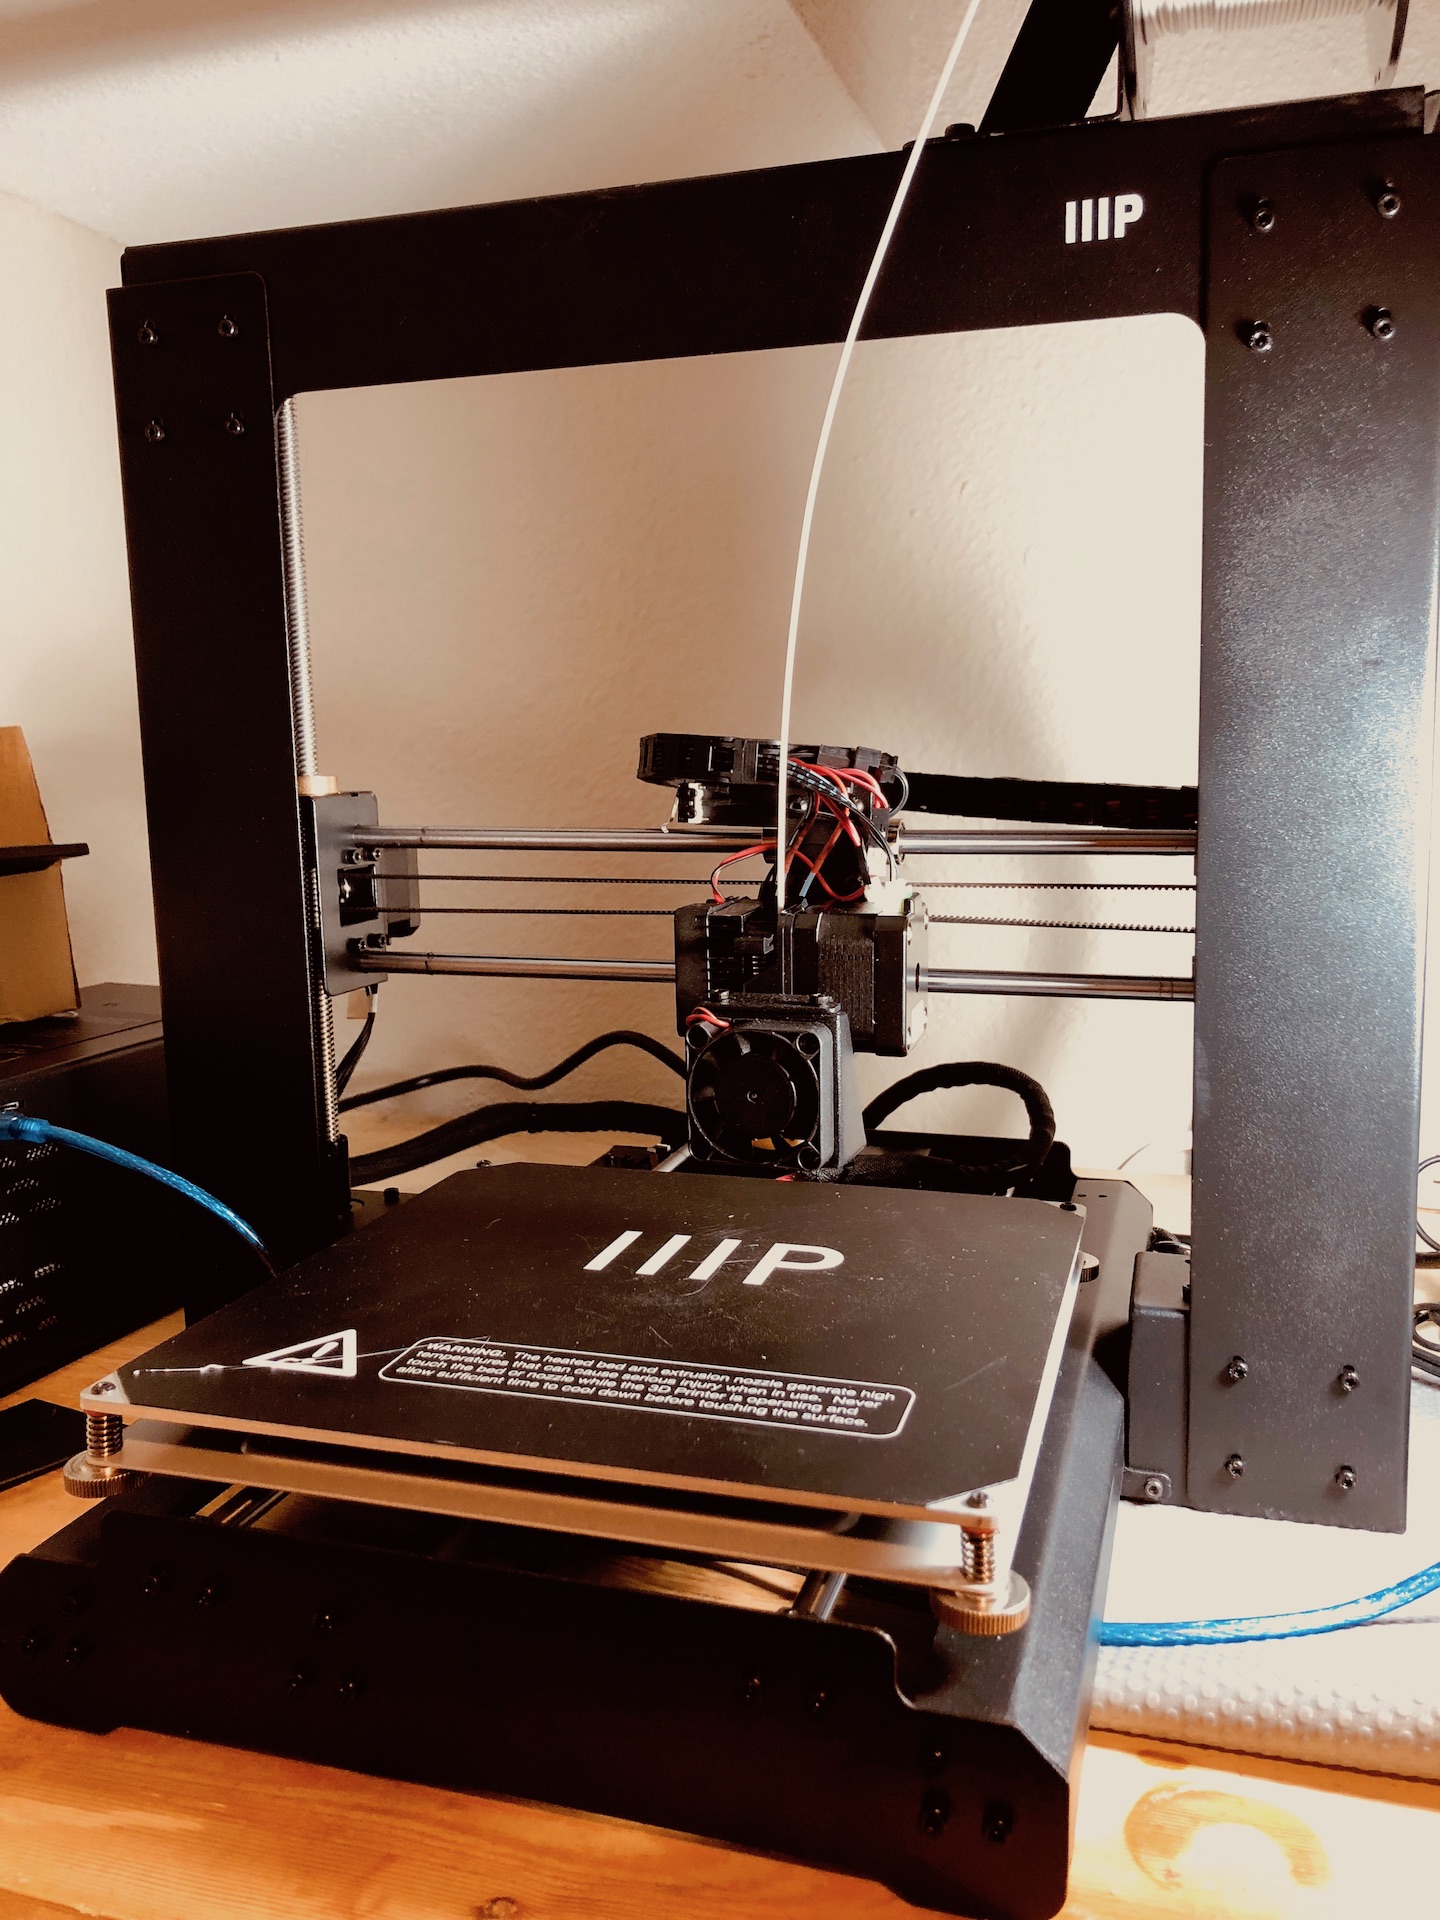
Just got a brand new Monoprice Maker Select 3D Printer for Christmas. This is my very first 3D printer so that means a new hobby has been born. Soon enough, I started learning what category my printer falls into – it’s features, capabilities, limitations, etc. After reading its manual and looking at some articles and videos online. I quickly realized that I’ve gotten a very open sourcey and “affordable” Chinese 3D printer. Don’t get me wrong, that’s all good – but knowing that piece of information helped me gather more details that were not obvious.
Here’s a few things that came to realization after doing research online about my printer and as a first time 3D printer owner.
Initial Thoughts
Most 3D Printer clones uses Arduinos as the main microcontroller board
If you need to print models from online marketplaces such as thingverse.com, you’ll need to download Ultimaker Cura software to slice/prepare model for 3d Printing.
The Monoprice Maker Select V2 is a clone of the WanHao i3 Duplicator v2 – This is important because you’ll need to know what firmware (software) the printer has before making and upgrade. And yes, you will need to upgrade your printer’s firmware for many reasons, but most importantly safety!
As of Dec 2018, the firmware it carries from the factory is the Repetier v0.91
No wireless printing, that’s right. You are stuck writing the gcode model into a SD Card, taking the SD card to the printer and start printing. That also means you cannot know the status of a current print, or even see what’s going on. Although, there are open source projects that offer a wide variety of monitoring, remote printing and much more, but it requires a Raspberry Pi. We’ll take a look at Octoprint in another post.
Other important components about the printer that needs to be discussed in more details: filament, bed heat, extruder, slicer, build plate adhesion, etc.
The assembly of this printer wasn’t that bad, since most pieces were already put together. I just needed to place the bed and frame together and fasten it with a few screws along with motor connectors.
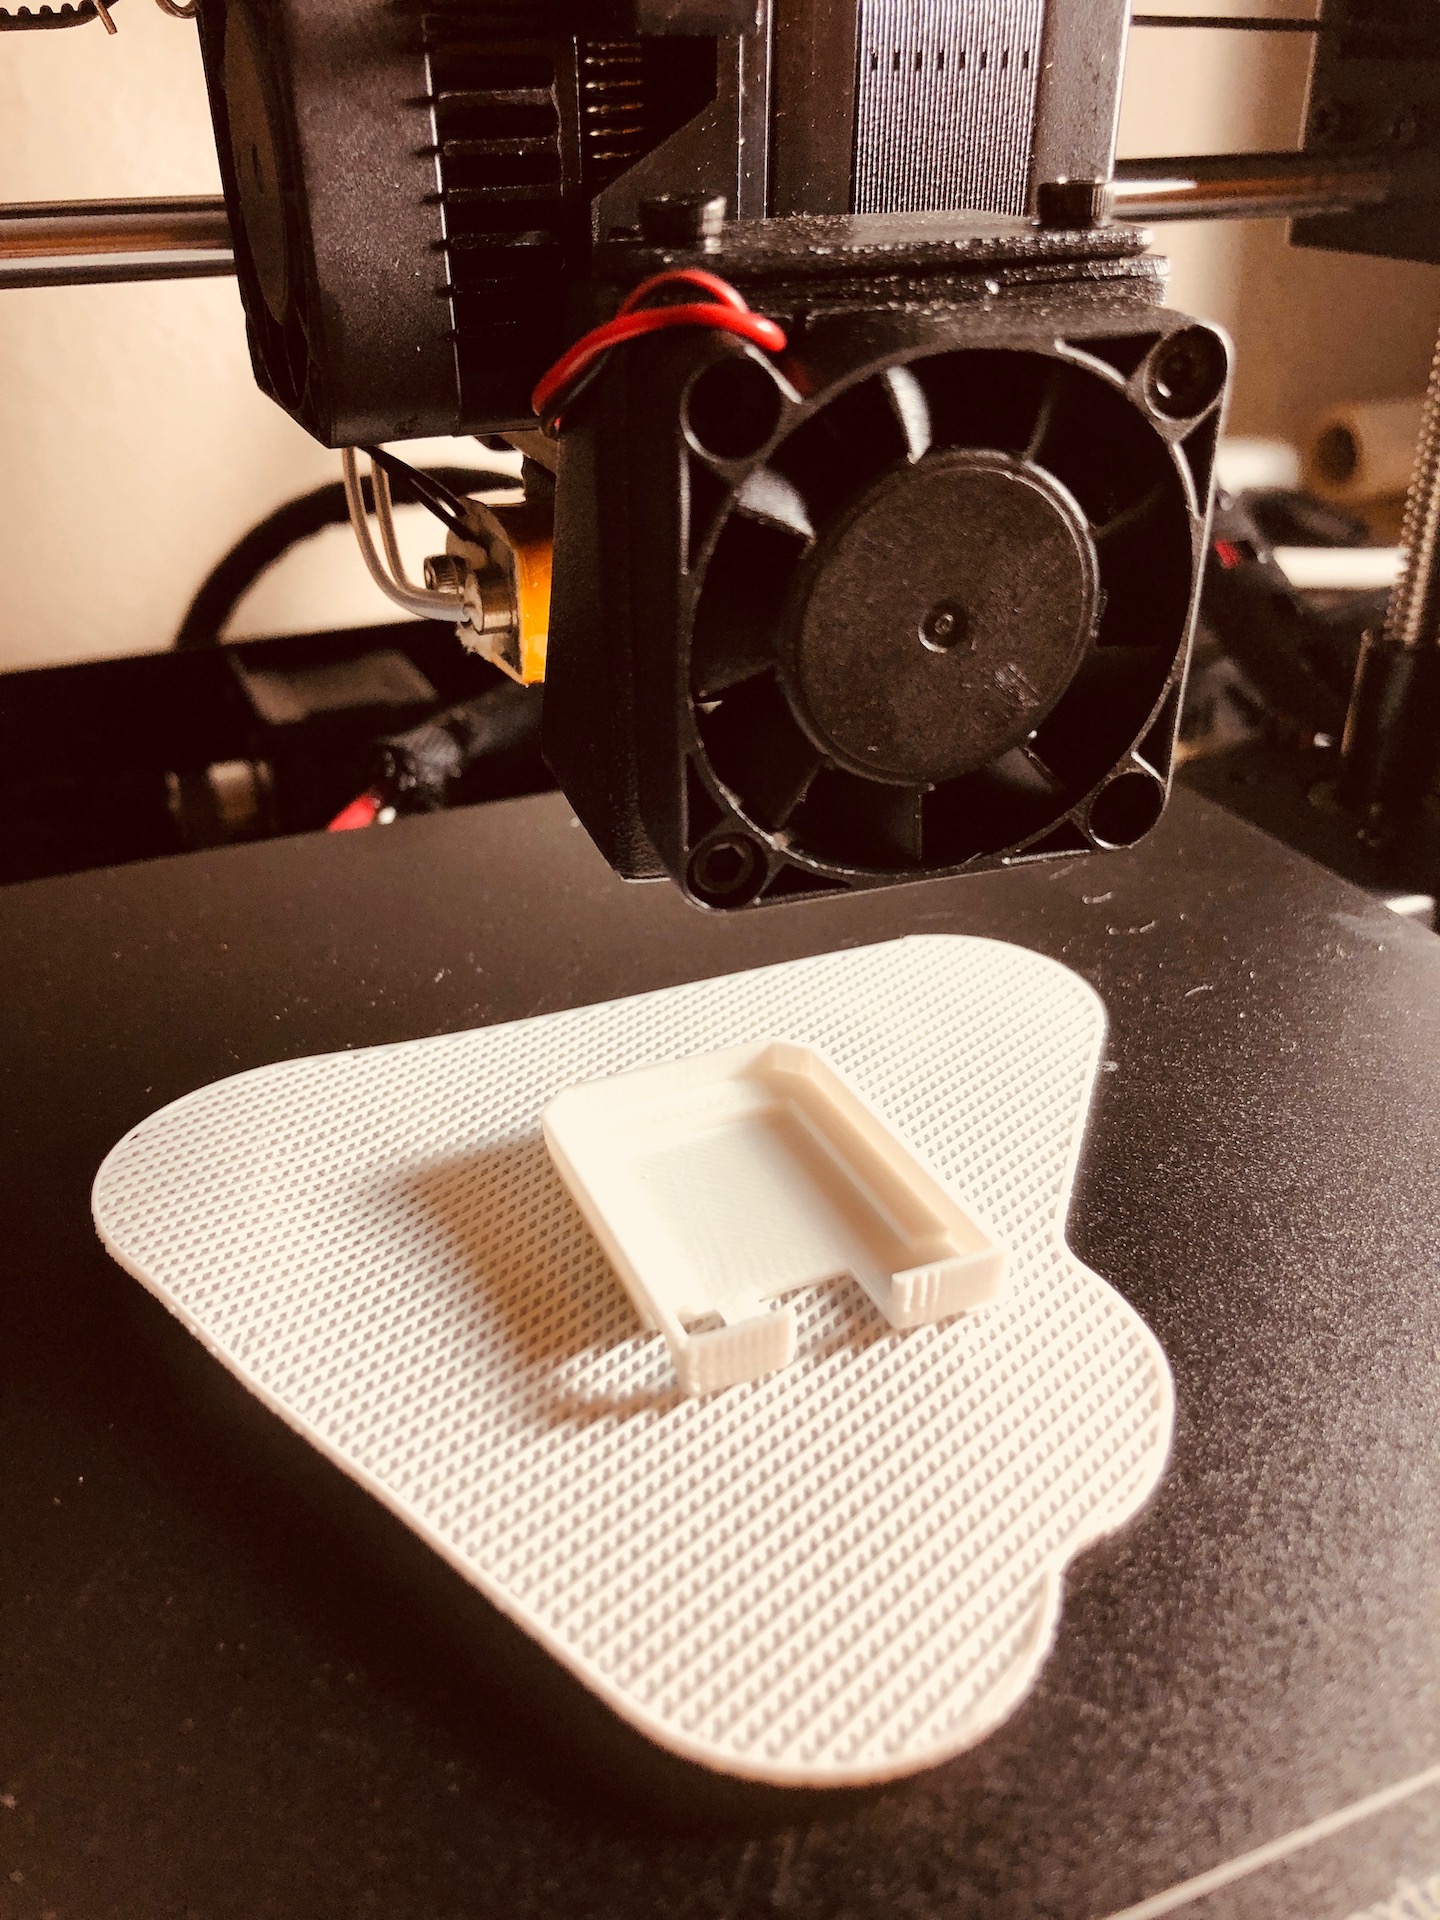
I really wanted to see how this guy prints, luckily it came with a SD Card and some preloaded models. Hence, I immediately set it to print something to see how this thing works.
Printing ESP8266 Case
I’ll add more to this post after more research and prints. For now, I’m trying to find the best case to house this project.
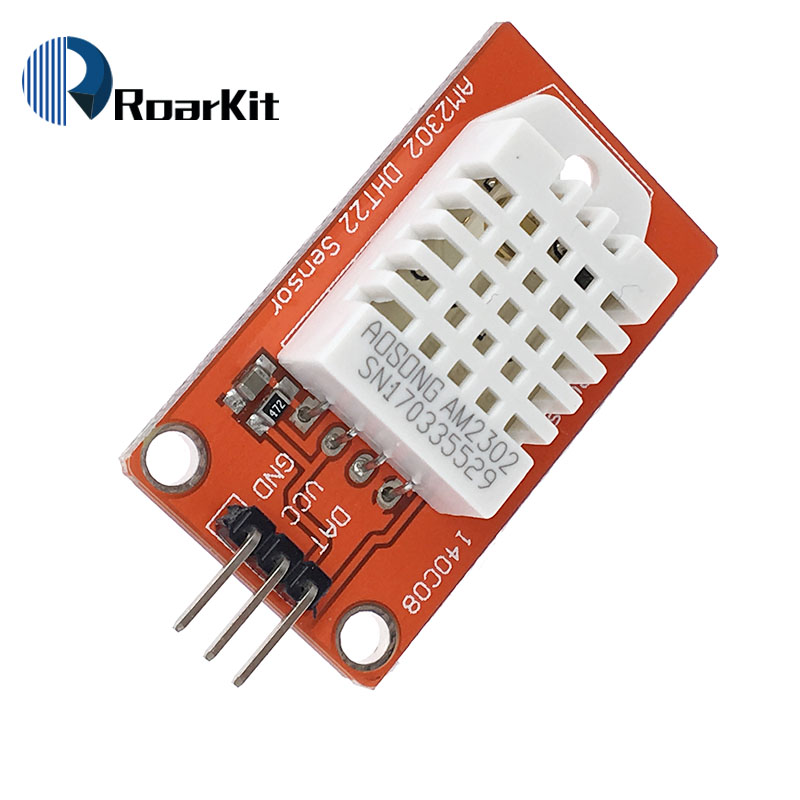
There are a lot of monitoring solutions that can be accomplished with the DHT22 (temperature & humidity) sensor. The DHT sensors comes in two models and packings – the DHT11 and the DHT22. In addition, you might find the sensors in a small shield/board module or by itself, see pictures below.
Fig 1: Tinker ready DHT22 Sensor
Fig 2: Standalone DHT22 Sensor
The main different between the standalone sensor and the others, is that you will need a 4.7k-10k pull-up resistor in your circuit when connecting the standalone DHT sensors.
DHT22 Technical Details
The DHT sensors uses one digital pin to communicate with the MCU. The DHT11 is more precise in terms of readings than the DHT22.
DHT22 Specs
3 to 5V power and I/O
2.5mA max current use during conversion (while requesting data)
Humidity readings with 2-5% accuracy
Temperature range between -40 to 80°C with ±0.5°C accuracy
Only 0.5 Hz sampling rate so once every 2 seconds
Getting Started
If you haven’t install the Arduino IDE or setup your NodeMCU, then head to our Getting Started guide.
We’ll be using the Arduino IDE for this guide, hence open it and create a new sketch. Lucky for us, there is already a DHT library available so go to: Sketch > Include Library > Manage Libraries
Now search for DHT and installed the DHT sensor library by Adafruit.
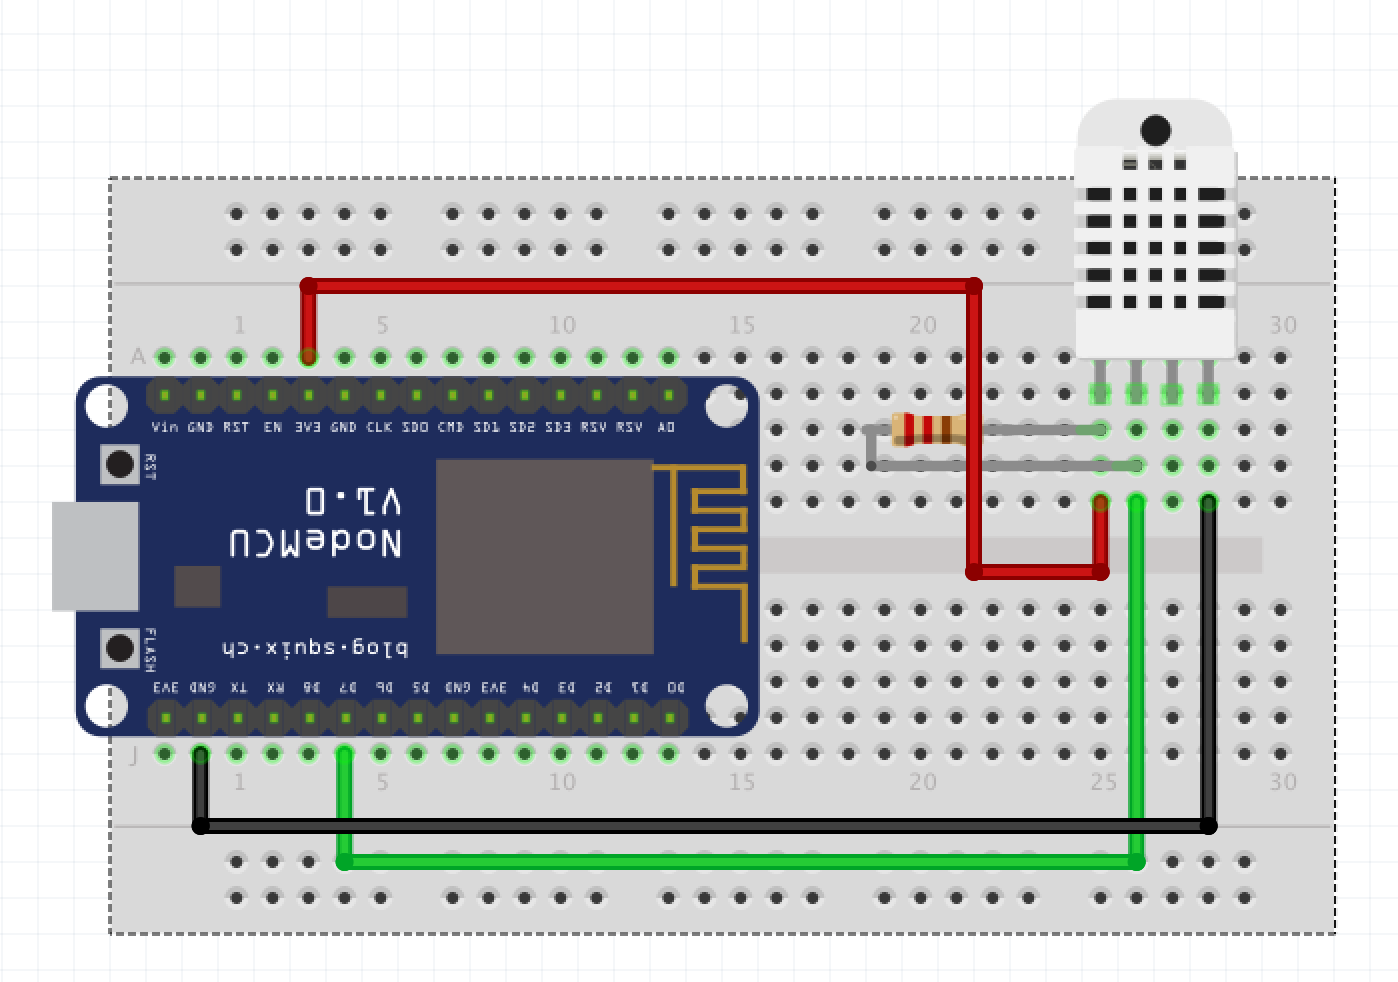
Let’s take a look at our circuit.
Code
There are a few different DHT libraries that can decode the temperature and humidity readings from the digital read out pin. For the purpose of this tutorial let’s use the Adafruit DHT Sensor Library
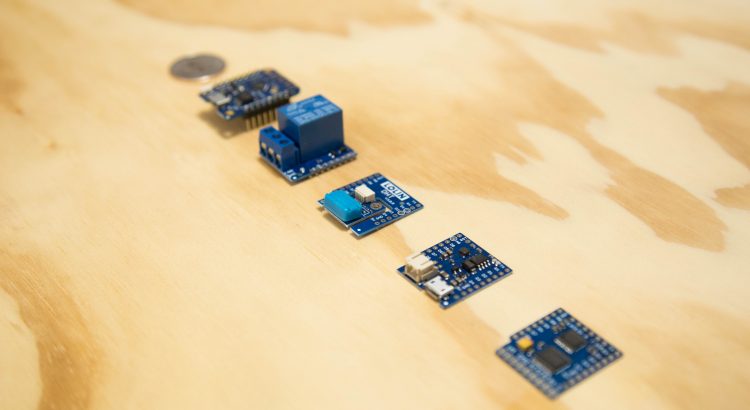
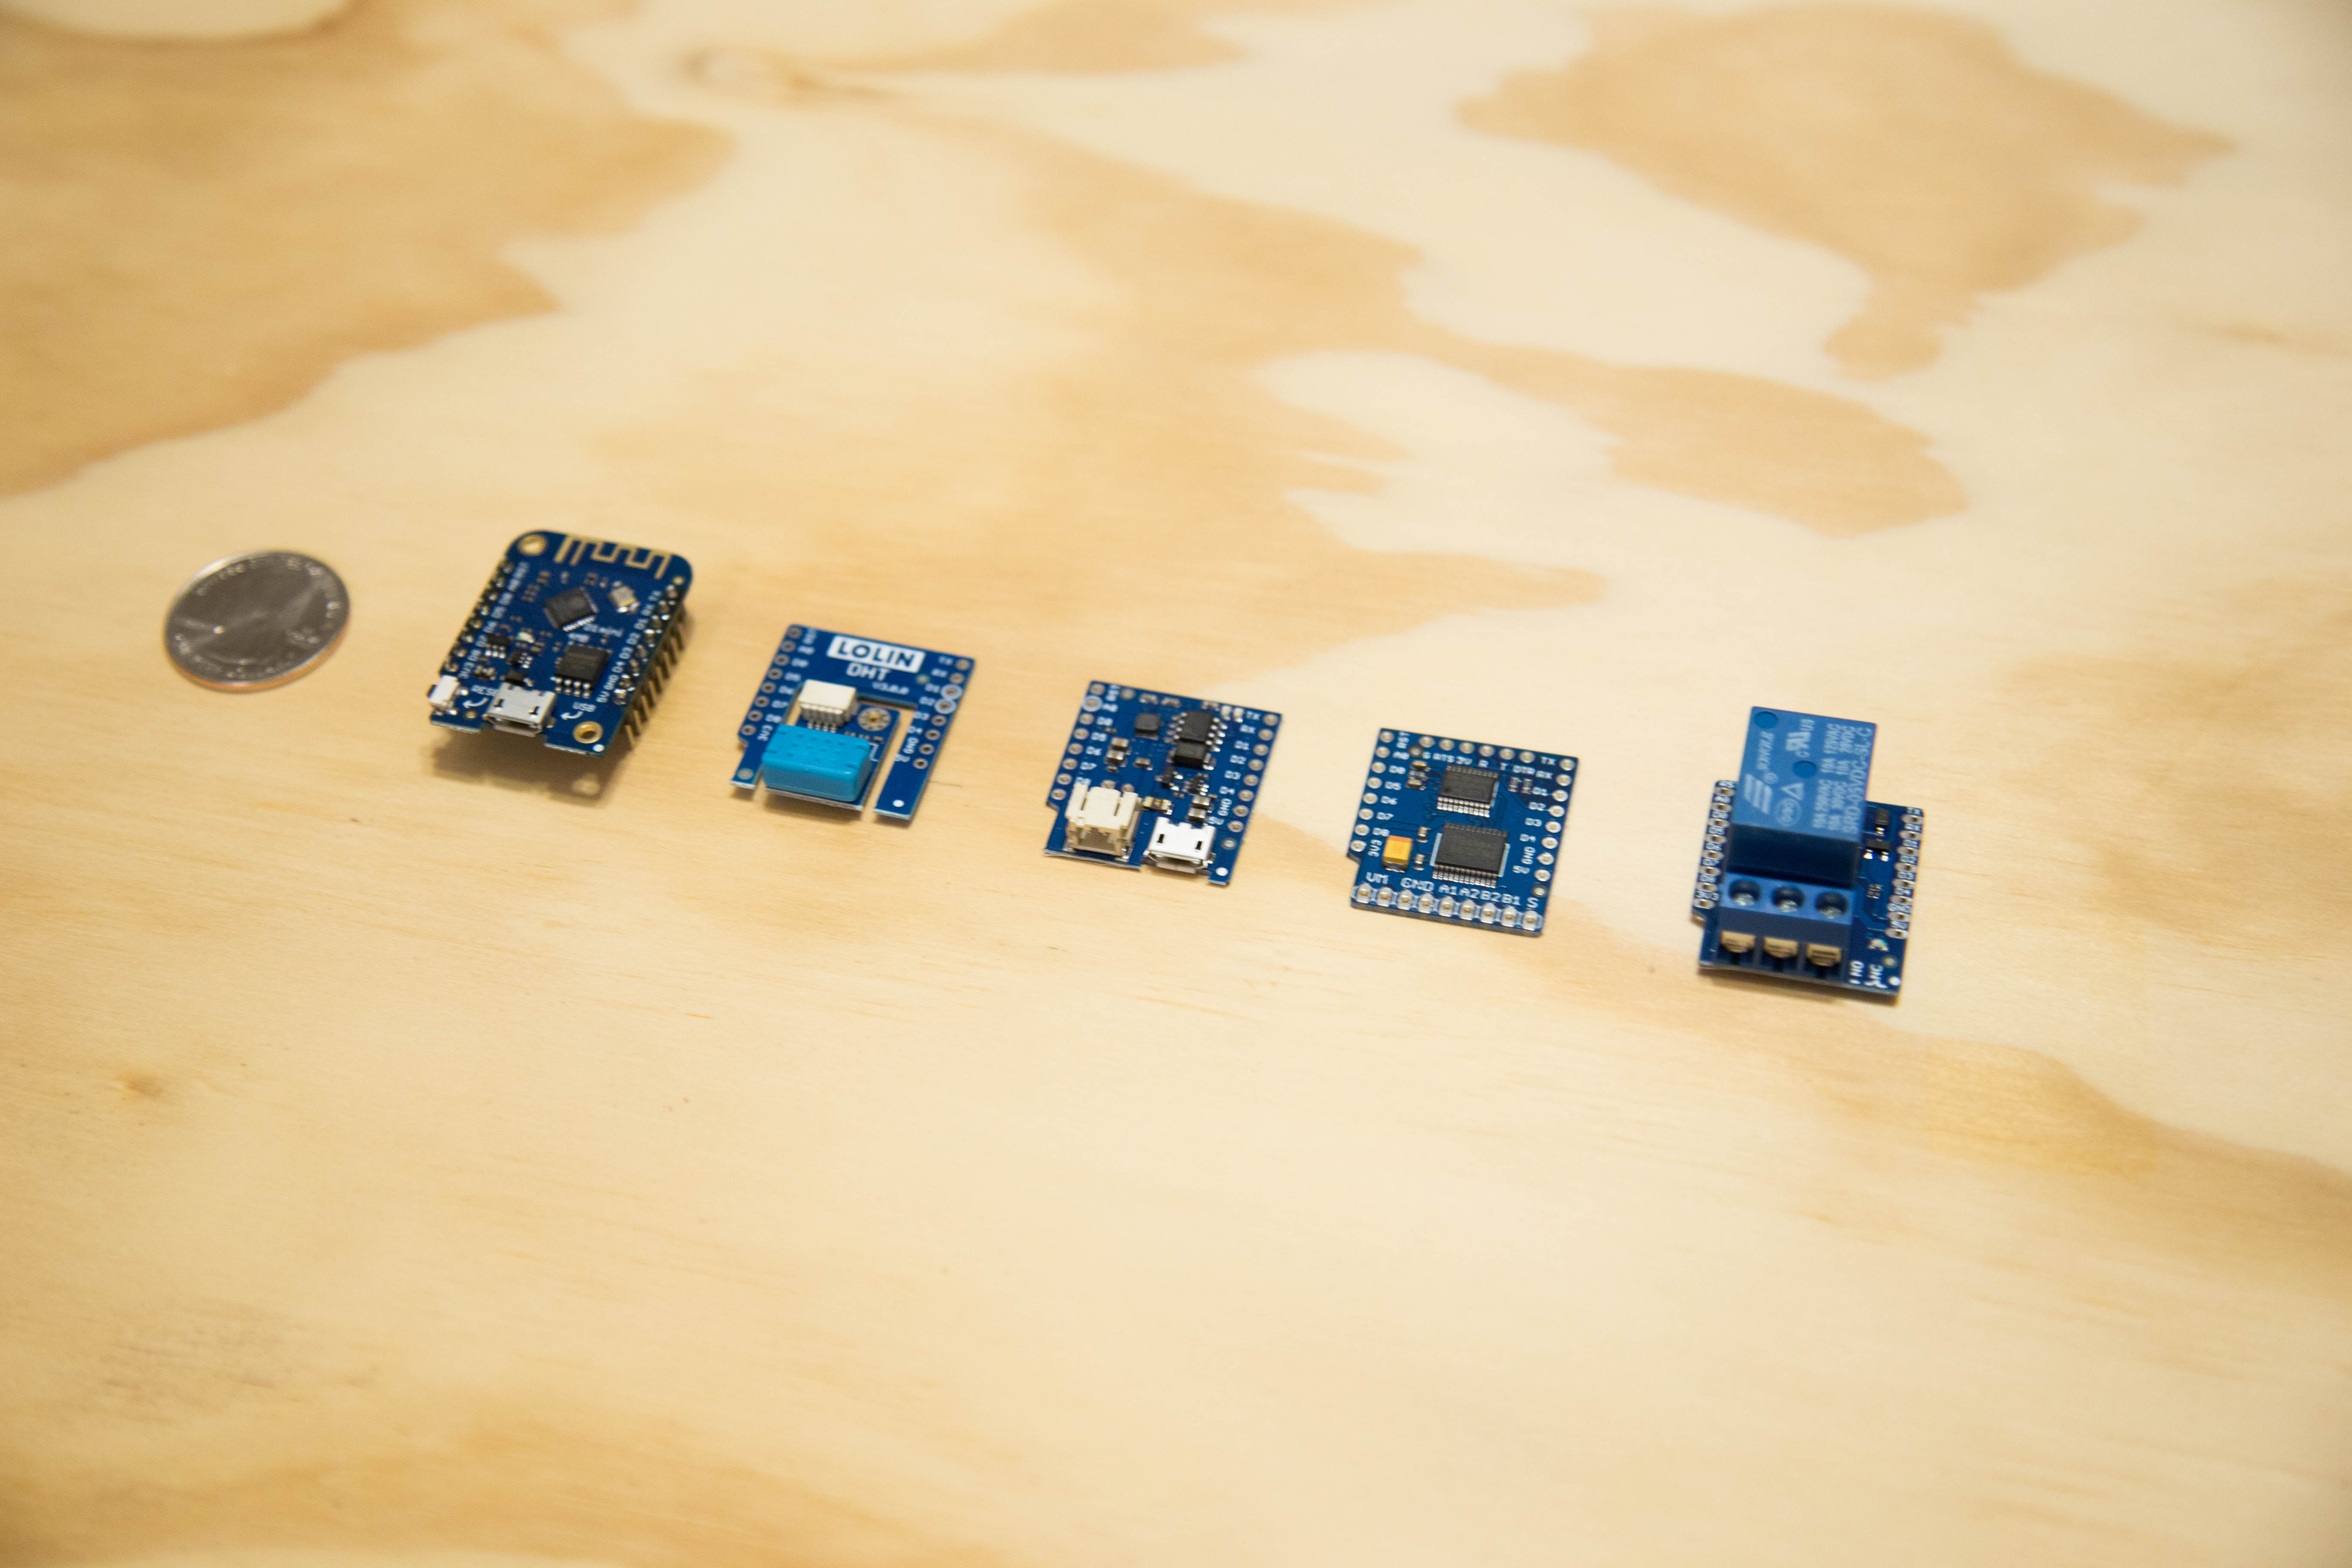
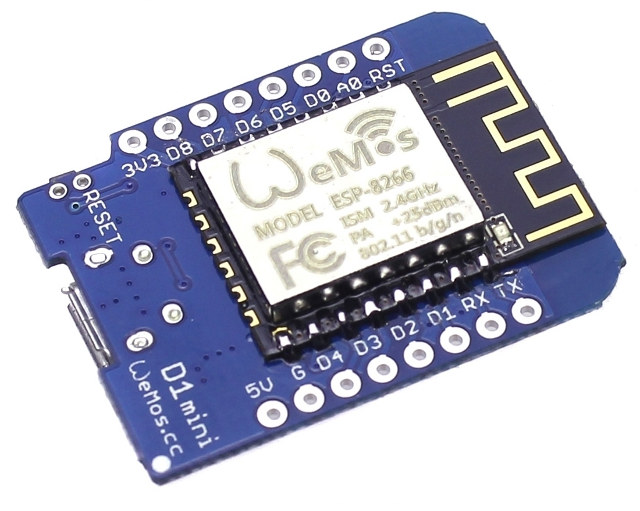
The Wemos D1 shields are tiny boards that contains the ESP8266 Wi-Fi chip. These little guys are great for compact projects. Not to mention, their shields make up a perfect combination of monitoring and control solutions.
Here’s a list of available Wemos D1 mini shields with the corresponding library to be used in your project.
The most popular of these shields is the DHT shield which allows for Temperature and Humidity sensor reading. Check out our article on how to configure this one.
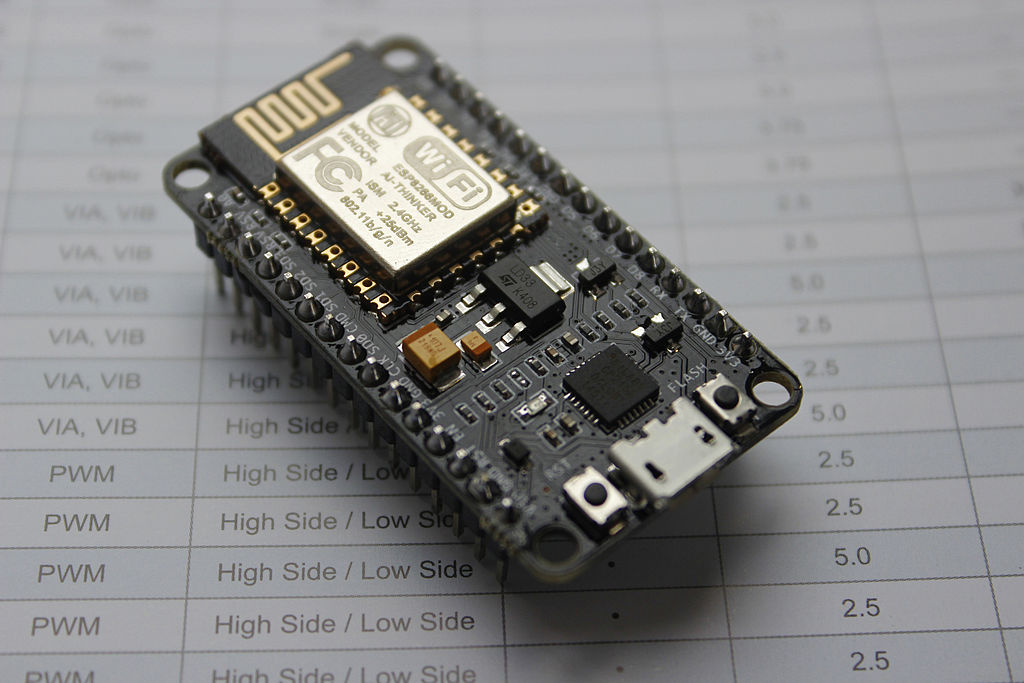
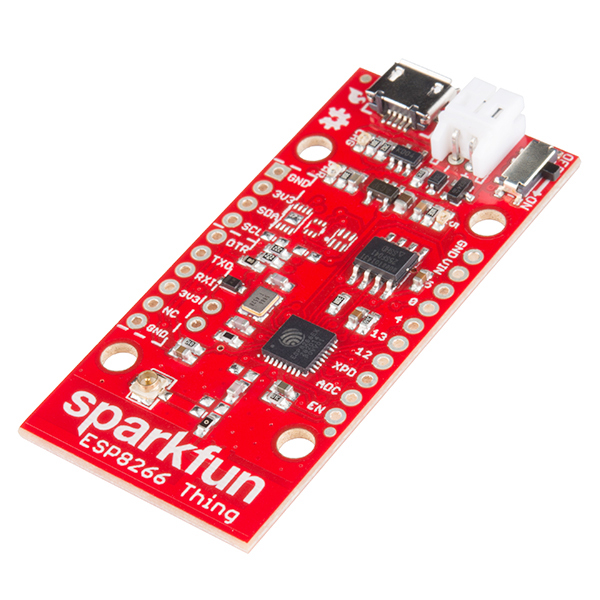
The ESP8266 is a small WiFi module that has become very popular in the maker and developer community. The ESP8266 comes in different flavors and form factors for example; you may use the WiFi module just by itself and a Microcontroller or bundled together in a development kit such as the NodeMCU.
Here’s a list of most popular dev kits with the ESP8266 module on the market:
ESP8266 Boards
Adafruit HUZZAH SparkFun Thing WeMoS (D1 Mini & Pro) NodeMCU
These dev kits are available from different distributors across the world so it makes them widely available.
Guides
Now let’s talk about what you need to tinker with these little guys and actually do something fun! All of these boards can be used with the Arduino IDE so if you don’t have it go ahead and install the latest version.
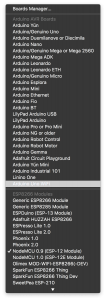
Next, install the Arduino ESP8266 Library. Under Arduino IDE, go to Preferences window and enter the following url under:
Second, go to Tools > Board > Board Manager and search ESP8266 and install library.
After successfully installing the library the board menu should now include a list of all supported ESP8266 board family.
Now you are almost ready to code and program the ESP boards. However, there is one more important step, drivers.
Each family of the ESP uses different USB to Serial interface drivers, without the right one for your operating system and board you won’t be able to flash these boards. Please see each family website for the right driver.
Connecting Wemos with Cayenne using MQTT is quick and simple. The Wemos D1 is one of the smallest board using the WiFi ESP chip. These also come with a variety of shields such as the DHT11 for temperature and humidity readings. Stay tune for other articles on how to take this module to a finish product and commercializing it.
Imagine the possibilities that these small MCUs can do when we connect it with an IoT Cloud such as Cayenne. In this tutorial, we are going to walk you through how to connect the Wemos D1, the DHT11 shield and Cayenne using MQTT. By doing so you will be able to send Temperature and Humidity data to Cayenne and visualize it.
Cayenne makes it easy and secured to connect Wifi and LoRa devices. Make sure to create an account and follow the steps below to add your first device.
Sketch Code
The follow sketch code requires the follow libraries:
// Tinkernlearn.com - This example shows how to connect the Wemos D1 pro & DHT11 with Cayenne using MQTT

//#define CAYENNE_DEBUG
#define CAYENNE_PRINT Serial
#include <CayenneMQTTESP8266.h>
#include <WEMOS_DHT12.h>

DHT12 dht12;

// WiFi network info.
char ssid[] = "WIFI_SSID";
char wifiPassword[] = "WIFI_PASSWORD";

// Cayenne authentication info. This should be obtained from the Cayenne Dashboard.
char username[] = "MQTT_USERNAME";
char password[] = "MQTT_PASSWORD";
char clientID[] = "MQTT_CLIENT_ID";

unsigned long lastMillis = 0;

void setup() {
	Serial.begin(9600);
	Cayenne.begin(username, password, clientID, ssid, wifiPassword);
}

void loop() {
	Cayenne.loop();

	//Publish data every 10 seconds (10000 milliseconds). Change this value to publish at a different interval.
	if (millis() - lastMillis > 10000) {
		lastMillis = millis();

    if(dht12.get()==0){
      Cayenne.celsiusWrite(1, dht12.cTemp);
      Cayenne.virtualWrite(2, dht12.fTemp, TYPE_TEMPERATURE, UNIT_FAHRENHEIT);
      Cayenne.virtualWrite(3, dht12.humidity, TYPE_RELATIVE_HUMIDITY, UNIT_PERCENT);
    }
	}
}

//Default function for processing actuator commands from the Cayenne Dashboard.
//You can also use functions for specific channels, e.g CAYENNE_IN(1) for channel 1 commands.
CAYENNE_IN_DEFAULT()
{
	CAYENNE_LOG("CAYENNE_IN_DEFAULT(%u) - %s, %s", request.channel, getValue.getId(), getValue.asString());
	//Process message here. If there is an error set an error message using getValue.setError(), e.g getValue.setError("Error message");
}
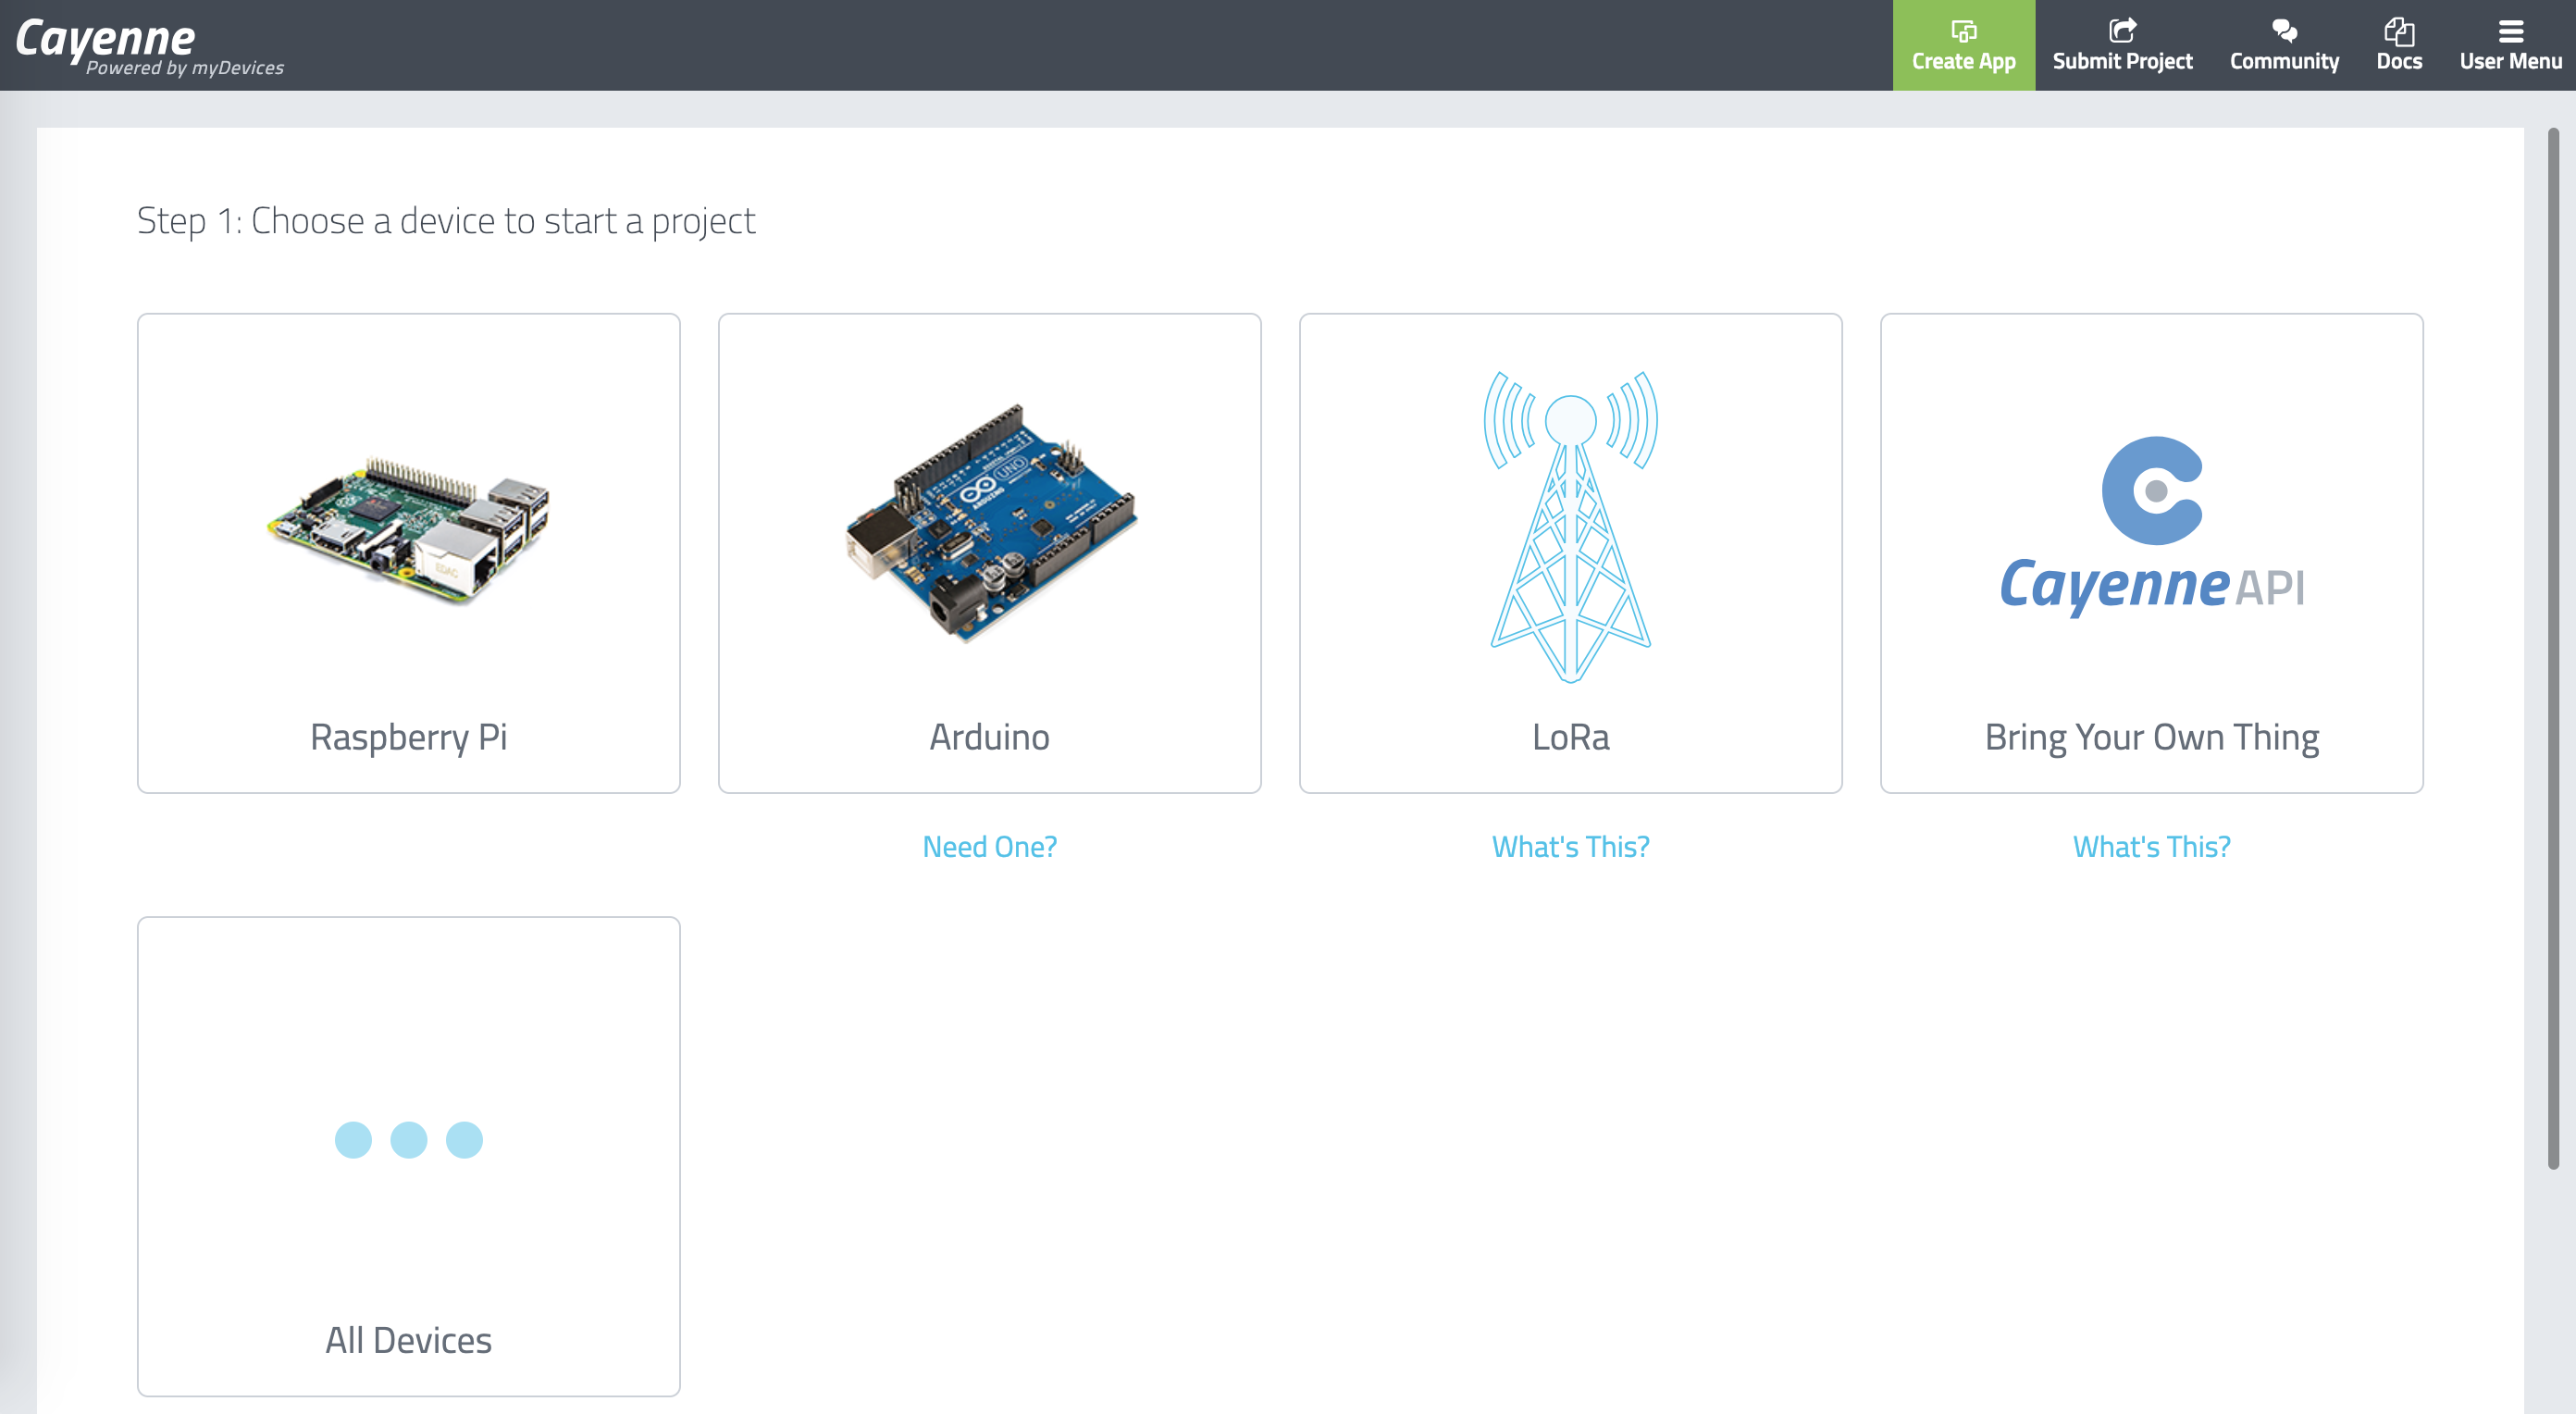
Getting Started with Cayenne
After logging in to your account you will see the screen below for the first time. If you have an existing account with devices, go ahead and click on: “Add Device”
2. Click on “Cayenne API – Bring your Own Thing” this will generate device MQTT credentials and indicate where to connect.
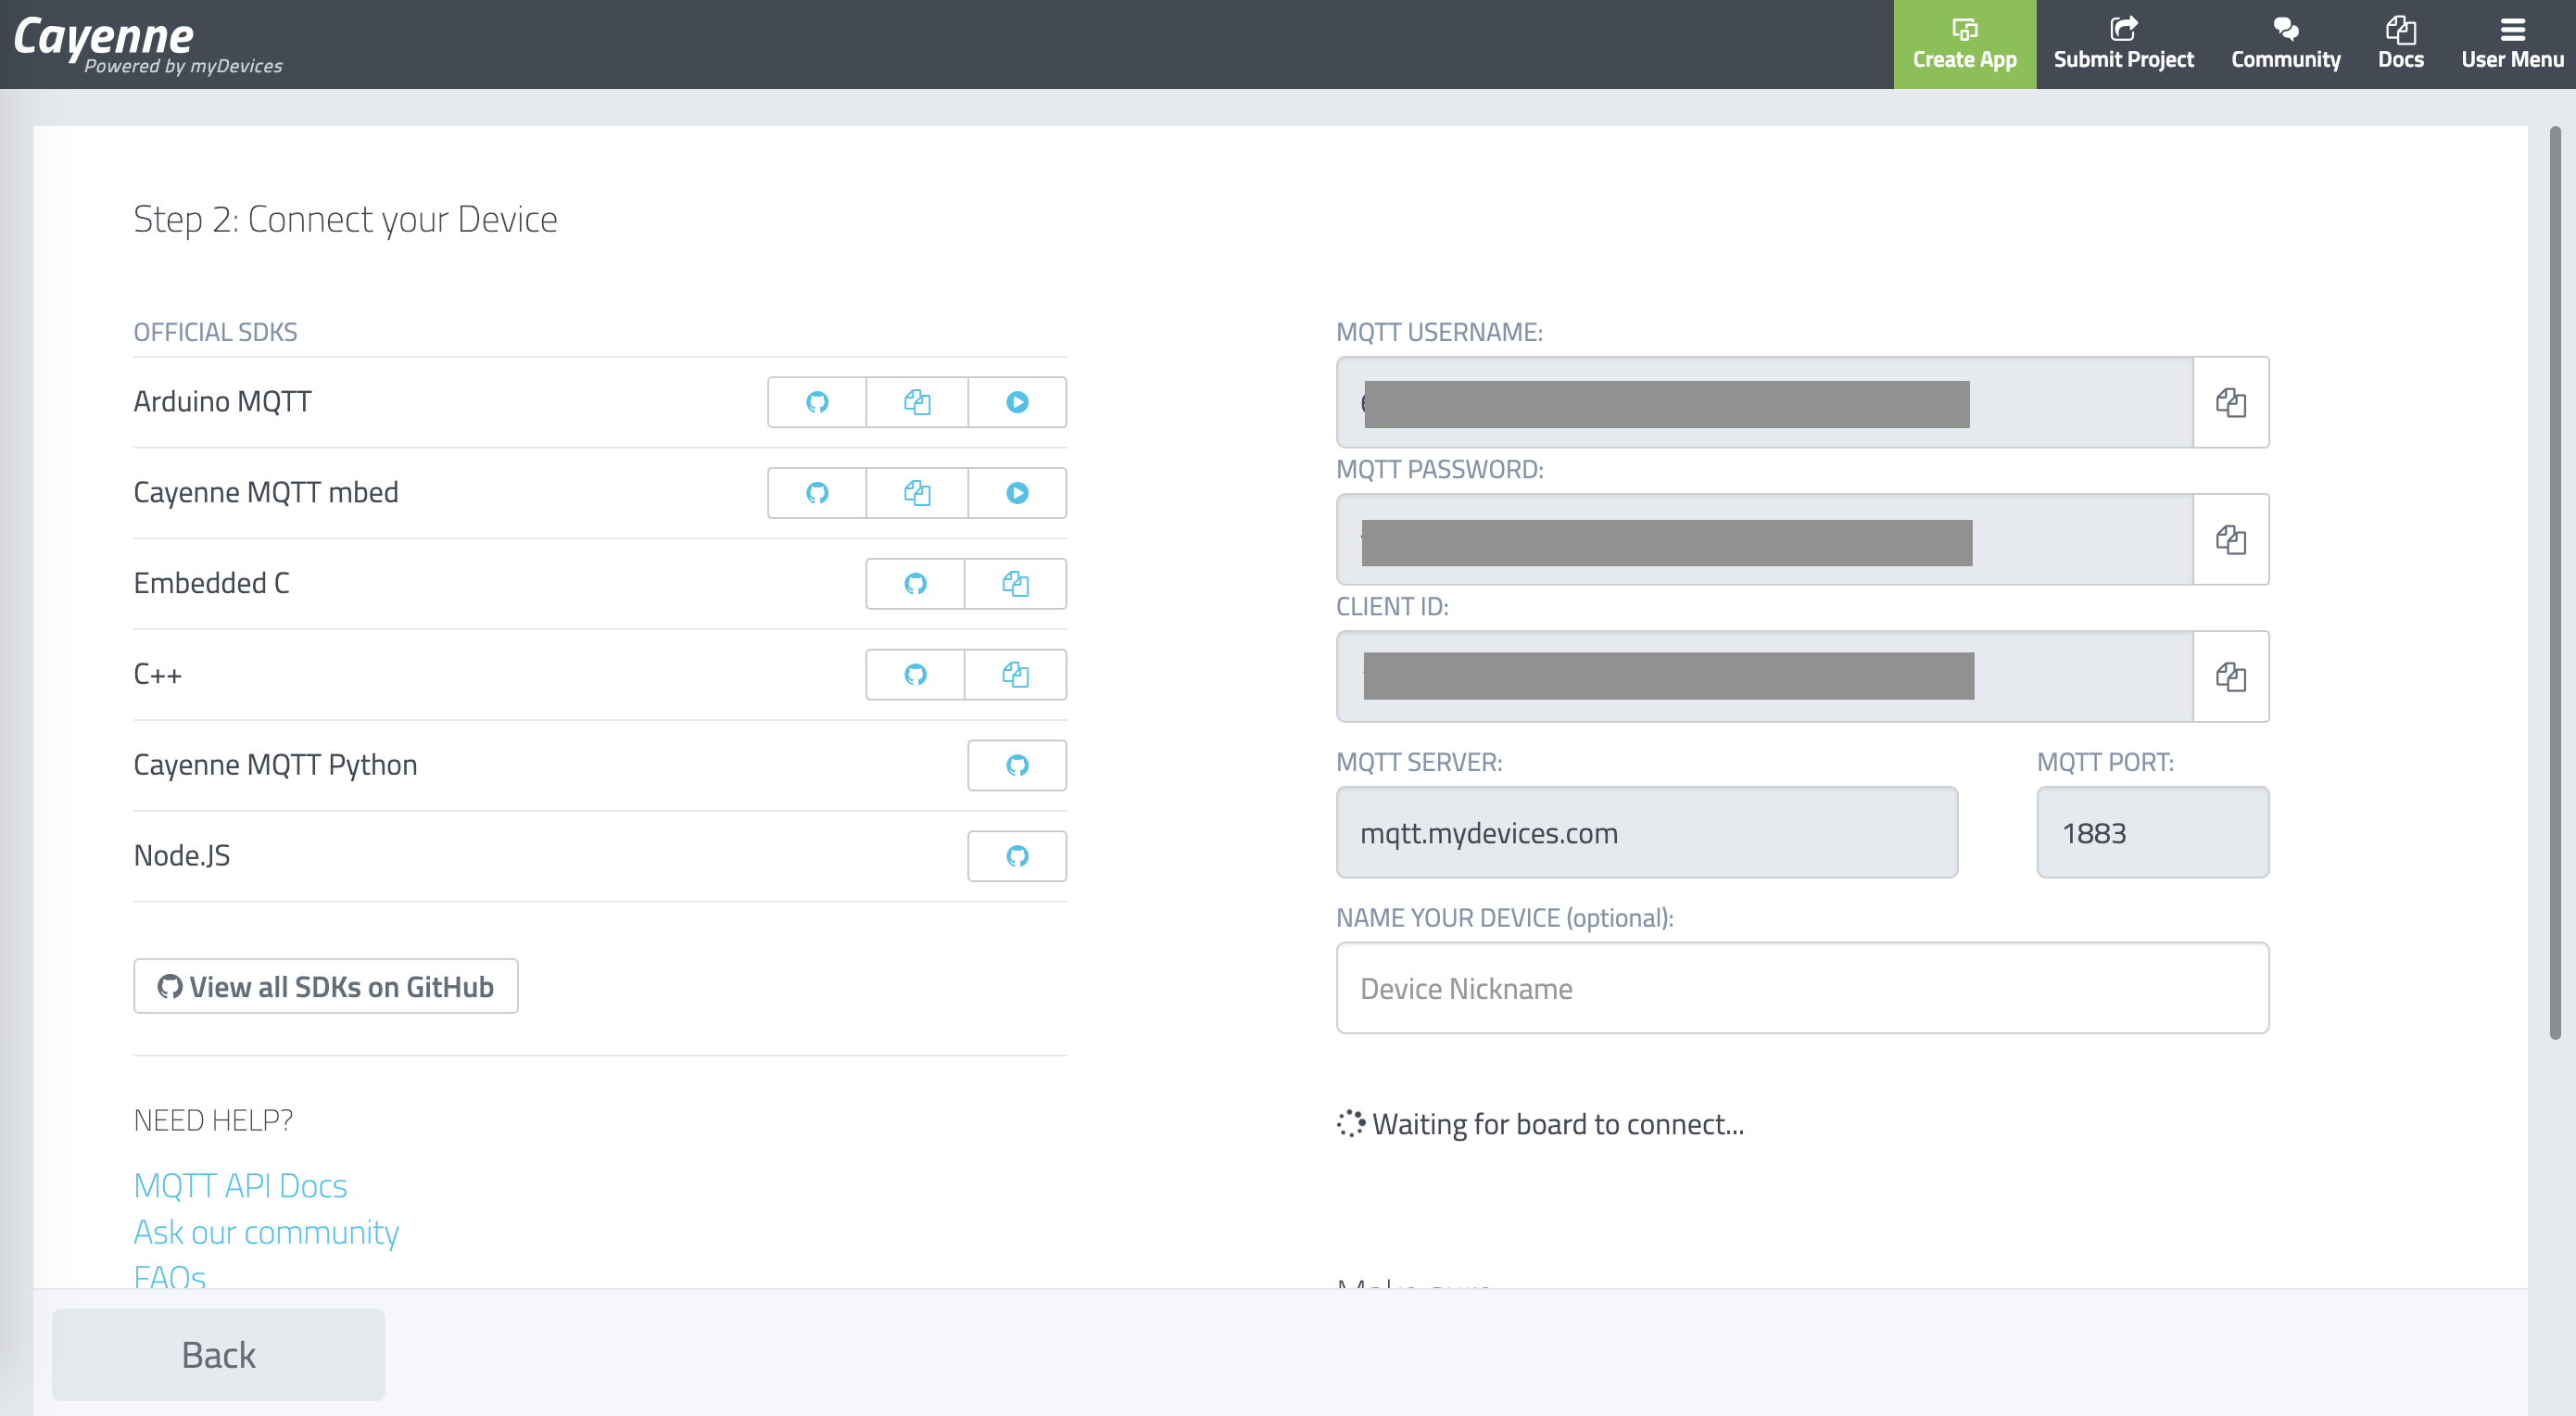
3. Copy each corresponding credential in the corresponding Sketch setting such as: MQTT_USERNAME, MQTT_PASSWORD and CLIENT_ID
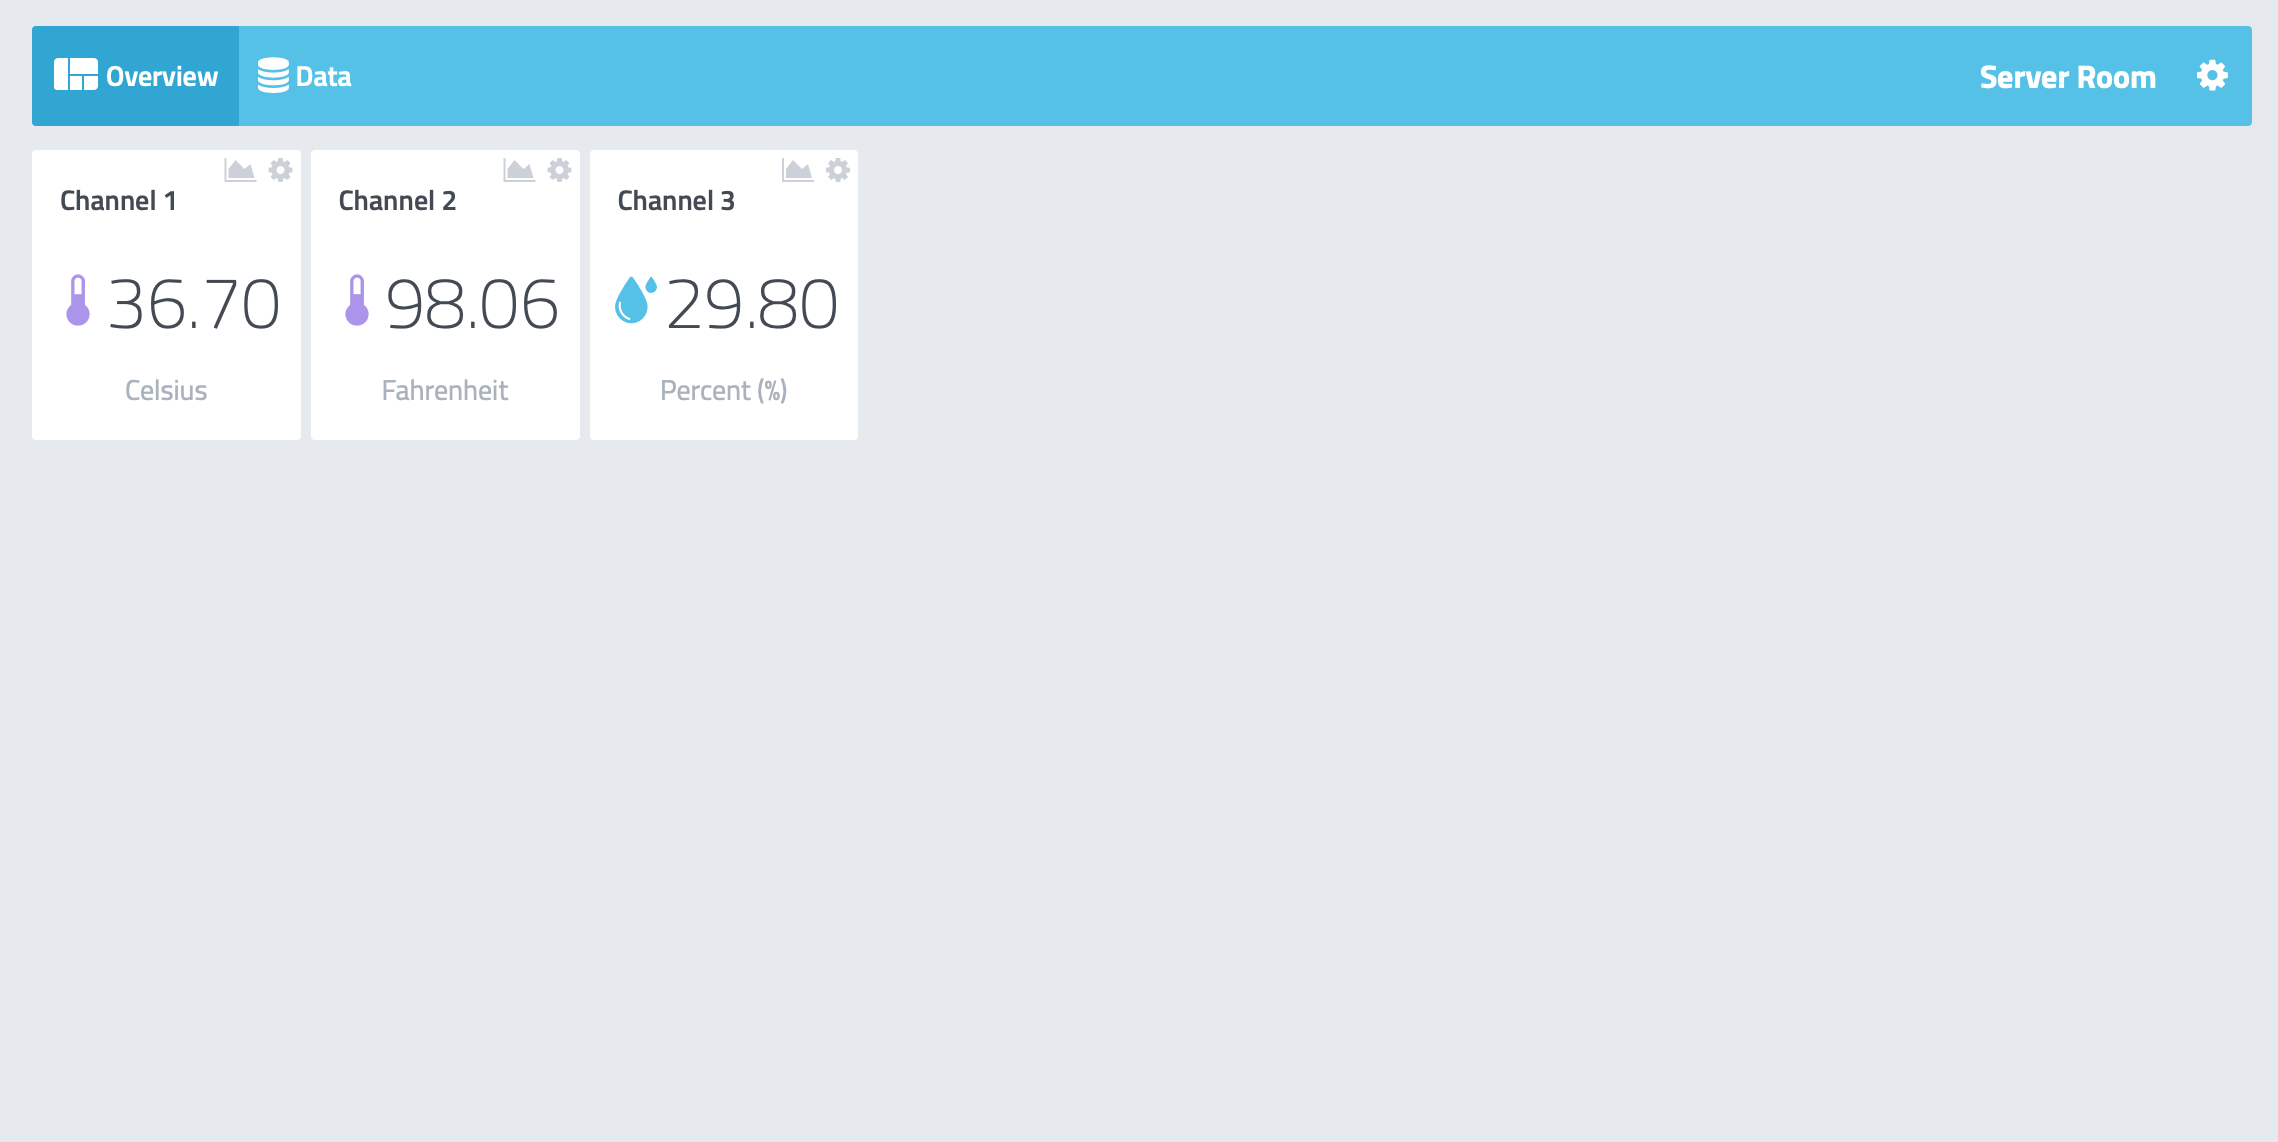
4. Once you compile and flash the board the application will redirect the dashboard your connected device.
Cayenne widgets will automatically pop up for your device with temperature and humidity reading.